Table of Contents
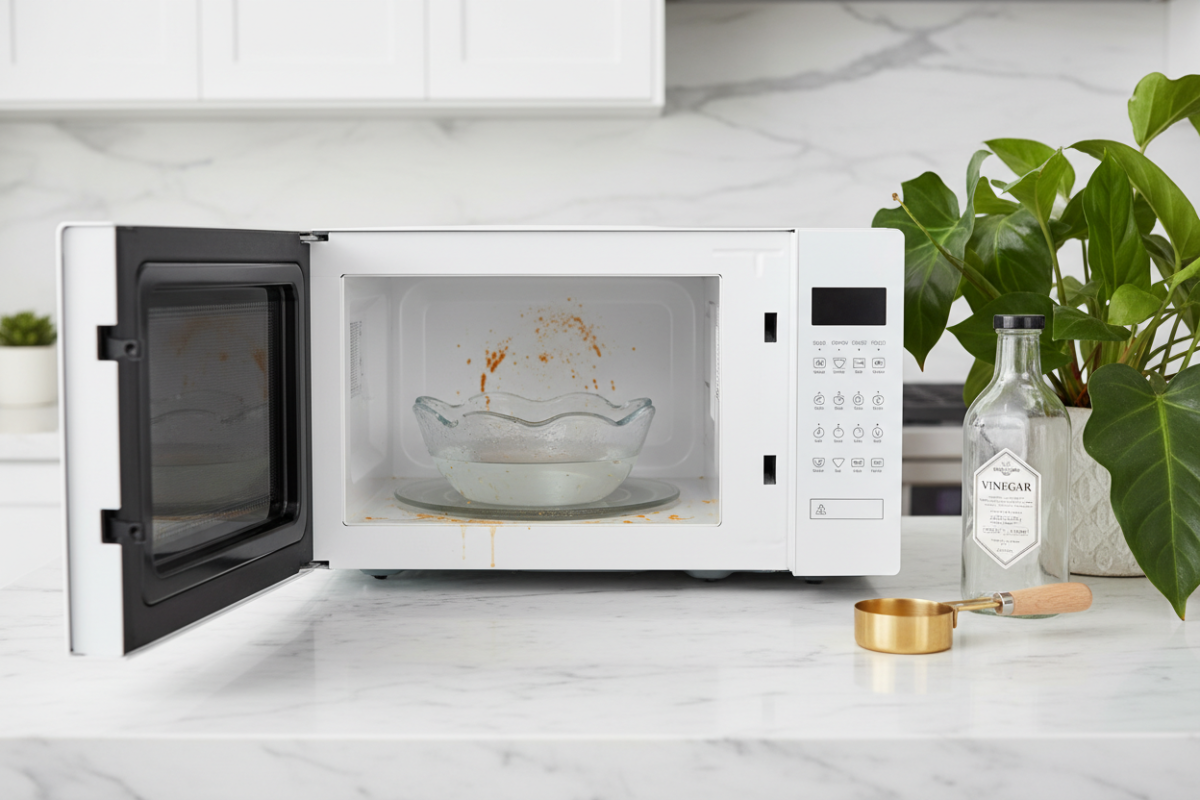
Have you ever opened your appliance’s door to heat up a quick snack, only to be greeted by the lingering smell of yesterday’s fish or the sight of stubborn, hardened splatters of tomato sauce clinging to the interior walls? We have all been there. Microwaves are one of the most frequently used appliances in any modern kitchen, which also makes them a magnet for spills, grease, and unpleasant odors. While it might be tempting to reach for a heavy-duty chemical cleaner to blast away the grime, there is a much safer, cheaper, and more effective method sitting right in your pantry. Knowing how to clean a microwave with vinegar is an absolute game-changer for your household cleaning routine.
In this comprehensive guide, we will walk you through the exact steps to restore your microwave to a sparkling, odor-free state using nothing but the power of steam and everyday white vinegar.
Why You Should Clean a Microwave with Vinegar
Before diving into the process, it is important to understand why vinegar is the ultimate secret weapon for kitchen cleaning. Many commercial cleaning products contain harsh chemicals that can leave behind toxic residues or strong artificial fragrances. When you are cleaning an appliance specifically designed to prepare food, using food-safe ingredients is highly recommended.
Here are the top reasons why you should rely on vinegar:
- Natural Degreaser: White vinegar contains acetic acid, a natural compound that effortlessly cuts through grease, fats, and oils left behind by exploding butter or sizzling bacon.
- Powerful Deodorizer: Microwaves tend to trap smells. Vinegar works to neutralize these alkaline odors at a molecular level, rather than just masking them with perfumes.
- Steam Loosens Grime: When you heat vinegar and water, it creates an acidic steam that softens rock-hard food splatters, saving you from exhausting scrubbing.
- Cost-Effective and Eco-Friendly: A bottle of plain white vinegar costs pennies per use and is completely biodegradable, making it a win for both your wallet and the environment.
What You Will Need for This Cleaning Method
You do not need an arsenal of expensive tools to get the job done. To effectively clean a microwave with vinegar, gather the following household items:
- White Distilled Vinegar: The star of the show. It is highly acidic and perfect for cleaning.
- Tap Water: To dilute the vinegar and create the necessary steam.
- A Microwave-Safe Bowl or Jug: Glass or ceramic works best. Avoid plastic, as it can sometimes warp or leach chemicals when boiled for extended periods.
- A Wooden Spoon or Toothpick (Optional but Recommended): Placing a wooden item in the bowl breaks the surface tension of the water and prevents superheating, which can cause the water to explode safely.
- Microfiber Cloths or a Sponge: For wiping away the loosened grime without scratching the appliance’s interior.
- Lemon Slices or Essential Oils (Optional): If you dislike the smell of vinegar, adding a slice of citrus or a drop of lemon essential oil leaves a fresh scent behind.
Step-by-Step: How to Clean a Microwave with Vinegar
Follow this foolproof, step-by-step process to get rid of crusty food stains, sticky residue, and foul odors in just a matter of minutes.
Step 1: Prepare the Vinegar and Water Solution
Start by measuring out your liquids. In your microwave-safe bowl or measuring jug, combine two cups of tap water with two tablespoons of white distilled vinegar. If your microwave is particularly dirty or smells strongly of burnt popcorn, you can increase the ratio to a half-cup of water and a half-cup of vinegar for a more concentrated acidic steam. If you are using a lemon slice for extra freshness, squeeze the juice into the bowl and drop the rind in as well. Drop in your wooden toothpick or wooden spoon to ensure the liquid boils safely.
Step 2: Steam the Microwave Interior
Place the bowl containing your vinegar solution right in the center of the microwave turntable. Close the door and set the microwave to run on high power. The exact time will depend on your microwave’s wattage, but generally, 5 to 7 minutes is the sweet spot. You want the liquid to reach a rolling boil so that the glass window on the microwave door completely fogs up with steam.
Step 3: Let the Steam Sit (Do Not Open the Door)
This is arguably the most crucial step of the entire process! When the timer beeps, resist the urge to immediately yank the door open. Instead, leave the door firmly closed for an additional 10 to 15 minutes. This trapping period allows the hot, acidic steam to deeply penetrate and soften those concrete-like splatters on the walls and ceiling of the appliance. It also gives the incredibly hot bowl time to cool down slightly, preventing accidental burns.
Step 4: Carefully Remove the Bowl and Turntable
After the steam has worked its magic, open the door. Carefully remove the bowl using oven mitts or a thick towel, as the liquid inside will still be quite hot. Next, take out the glass turntable and the rotating ring underneath it. Place them in your sink to be washed separately.
Step 5: Wipe Down the Interior Walls and Ceiling
Take a clean, slightly damp microfiber cloth or soft sponge and begin wiping down the inside of the microwave. Because the steam has loosened everything up, you should find that the grime simply melts away with a single swipe. Start at the ceiling (where the worst splatters usually hide), move to the side walls, wipe the back, and finish by sweeping all the crumbs onto the floor of the microwave and out the front.
If you encounter a particularly stubborn spot that refuses to budge, simply dip the corner of your cloth into the warm vinegar solution you just removed, and gently rub the stain until it disappears.
Step 6: Wash the Turntable
Wash the glass turntable and the roller ring in your sink using warm water and regular dish soap. If the turntable has baked-on grease, you can use the leftover vinegar water to scrub it clean. Dry the parts thoroughly with a dish towel before returning them to the microwave.
Step 7: Do Not Forget the Exterior and Control Panel
A truly clean microwave looks great on the outside, too. Fingerprints, grease from the stove, and dust easily accumulate on the door and keypad. Mix a solution of equal parts water and vinegar in a spray bottle. Important: Never spray liquid directly onto the microwave’s control panel, as it can seep behind the buttons and cause electrical damage. Instead, spray the vinegar mixture onto your microfiber cloth, then gently wipe down the keypad, the handle, the door, and the top and sides of the appliance. Buff with a dry cloth to prevent streaks.
Tips for Keeping Your Microwave Clean Longer
Once you have put in the effort to clean a microwave with vinegar, you will want to keep it looking pristine for as long as possible. Here are some proactive maintenance tips:
- Always Cover Your Food: The easiest way to prevent a mess is to stop it before it happens. Use a microwave-safe cover, a paper towel, or a microwave-safe silicone lid over your bowls and plates to catch splatters from soups, sauces, and stews.
- Wipe Up Spills Immediately: If a spill does occur, do not let it cool and harden. Grab a damp cloth and wipe it up as soon as the appliance is cool enough to touch safely.
- Use Lower Power Settings: Heating certain dense foods or dairy products on “High” causes them to explode rapidly. Utilizing lower power settings or utilizing the defrost function properly can heat food more evenly and prevent sudden popping.
- Perform Routine Maintenance: Do not wait until your microwave is a disaster zone. Do a quick 3-minute vinegar steam every two to three weeks to maintain a spotless, hygienic cooking environment.
Frequently Asked Questions
Can I use apple cider vinegar instead of white vinegar? Yes, you can absolutely use apple cider vinegar if you do not have white vinegar on hand. It has a similar acidity level and will create the steam needed to soften grime. However, apple cider vinegar has a sweeter, fruitier scent and is slightly more expensive, so white distilled vinegar is usually preferred for household cleaning.
Will the vinegar smell linger in the microwave? While the vinegar odor might be strong while it is boiling, it dissipates very quickly. In fact, once the appliance dries, the vinegar will take all the bad odors with it, leaving your microwave smelling completely neutral. If you are very sensitive to the smell, adding a few drops of lemon juice to the boiling bowl will mask the scent completely.
Is it safe to boil liquids in the microwave? Yes, but you must be cautious of “superheating,” where water heats past its boiling point without bubbling, causing an eruption when disturbed. To prevent this, always place a non-metallic object like a wooden toothpick or a wooden stirring stick in the bowl before microwaving it.
Conclusion
A dirty microwave is an eyesore and can harbor unpleasant odors that affect the taste of your food. Fortunately, maintaining a spotless kitchen appliance does not require aggressive scrubbing or expensive toxic chemicals. Learning how to clean a microwave with vinegar is an incredibly easy, cost-effective, and natural way to tackle tough messes and baked-on food. By harnessing the power of acidic steam, you can simply wipe away the grime and get back to enjoying your favorite meals in a fresh, clean appliance. Make this simple vinegar steam method a regular part of your monthly kitchen cleaning routine, and you will never dread cleaning the microwave again!